We sell a complete line of packing and moving supplies, as well as providing professional Packing and Unpacking services.


Make a note of your shipment registration number found in the upper right hand corner of your Bill of Lading and keep it with you in case you need to call your mover with questions about your shipment
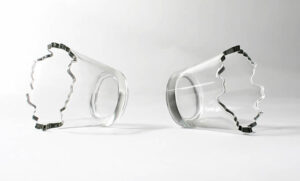
When it comes to moving, one of the most difficult items to pack is your glassware. Unlike all your other belongings, glassware needs to be handled with extra care throughout the move to ensure it arrives in your new home in the same condition it left your old home.
Packing Material
The most important step when it comes to packing your glassware is using the right type of packing material.
Remember:
Glass is fragile and will chip or shatter if it comes in contact with other items in a box. Make sure to individually wrap each item so that it is protected throughout the move.
Depending upon what type of glass you are moving you may want to consider these packing materials:
The Right Box
Once you have wrapped all your glassware it is now time to find the proper cardboard box to store these items in. Make sure that the cardboard boxes that you choose are:
Proper packing tape is also an important factor when it comes to protecting your glassware. The last thing you want is for the bottom of your box to open and your glassware to spill and break all over the floor.
Label
Ensure that your boxes are properly labeled and marked. Include the word fragile. It is recommended that you label each box’s contents. This will not only allow the movers to properly stack your boxes, it will also make your job of unpacking that much easier. It is a good idea to label all your boxes, not just the fragile ones. Take the extra time to wrap and protect your dishes and glasses and you should enjoy a break-free move.

In the moving world, some items are easier to move than others. Generally speaking, the most difficult belongings to move are usually your furniture and your bed. They tend to be heavier and far more cumbersome, which can make them a moving nightmare. As the premier Kamloops movers, we would like to share the following tips on how you can move your bed hassle-free.
Stick to the Plan
A well-planned move is a less stressful move. By putting in the extra effort before the move, you should see the benefits during. When it comes to moving your bed, especially a king-sized bed, make sure that your plan includes the following:
Pack it Right
To properly move your bed, you are going to need the right packing and moving materials. These include:
Follow the Steps
There is a step-by-step process that will make moving your bed easier.
These simple steps will allow you to move your bed without any damage or difficulties. If you would like more tips on how to move your bed or are interested in some of the moving services that we offer, please contact us today.

Perhaps the most difficult part of the moving process is dealing with your furniture. Many of these items are typically heavy, cumbersome, and difficult to fit through doors, around corners and up and down stairs. The last thing you want is to damage or scratch your furniture, the walls or door frames. As the premier Kamloops movers, we would like to offer you this guide to protect your furniture during the move.
Evaluate and Measure
Before jumping right into the moving process, take the time and come up with a plan for each large furniture piece. Decide if you are going to be bringing all your furniture with you or if you will be discarding and replacing it. Also look to see if any of your furniture is fragile, breakable or extremely valuable (i.e. Antiques). If this is the case, you will probably want to have those items professionally packed.
Once you have formulated a plan for your furniture, measure each piece. When measuring, make sure to:
Take it Apart
After your furniture has been measured and evaluated, see what parts can be disassembled to make the moving process easier, lighter and less cumbersome. Some common parts to dissemble include:
Here’s the Deal:
Label furniture pieces for easy reassembly. Also, label and attach nuts, screws and washers to the corresponding piece of furniture in a plastic zip lock bag.
Protect your Furniture
When you begin to move your furniture, protect to prevent any scuffing or damage. Some creative ways to protect your furniture include:
Ask the Professionals
No amount of protection can possibly replace the experience, knowledge and skills of professional movers. We have moved countless pieces of furniture without damage and offer a wide range of moving services to assist you with this task. We provide free estimates and our friendly, professional staff can ensure that your moving experience is as stress-free and positive as possible. To see how we can help, please contact us today.

A pool table is an excellent source of cheap entertainment that can provide hours of unlimited fun. However, a pool table is also a major inconvenience when you need to move it to your new home. With the right instructions and tools, you will be able to easily and safely disassemble and pack your pool table and get it ready for your long-distance move.
As your premier Kamloops movers, here is a detailed step by step set of instructions for taking apart and preparing your pool table for your upcoming move.
The Proper Tools
To efficiently and effectively disassemble your pool table, you are going to need the proper tools. This list of tools includes:
Disconnecting the Pocket Liners
If your pool table has pocket liners, then this is where you will start. If you do not have liners, please go to the next step.
Remove the staples or screws that are holding the liners to the table. You will then be able to squeeze the sides of the pocket and push each liner through the apron. Do this for all six pockets and be sure to label and store the liner screws.
Remove Rail Bolts and Corner Miters
It is now time to remove the rail bolts on your pool table. Lay underneath the table and begin removing the bolts with your ratchet. Typically, each rail will have 3 bolts for a total of 18. During the process, do not remove the smaller apron bolts.
Here’s the Deal:
If you have an older table, the rails may be attached in two places with different bolts. In this case, you will need a special forked tool to remove them. You can get this tool from your local pool table supply store or order it online.
Once you have removed the rail bolts you can remove the system and flip it over. This is a 2-person job as it is quite heavy. On each corner of the rails you will find two corner casting brackets that you will need to remove with a flat head screwdriver. You can then lift out each corner piece, then store and label it in a Ziplock bag.
The sheer size and weight of a pool table makes it impossible to move without breaking it down into pieces. This is the first part of the step by step process required to safely and effectively disassemble and pack your pool table for a long -distance move.

Here are the final steps on how to safely and effectively disassemble your pool table for your next long-distance move.
Removing the Aprons
Chances are, your pool table has four aprons that are attached to the rails with bolts. Undo each bolt and remove the aprons. Be sure to wrap them individually in a blanket to protect them during the move.
Removing Pocket Casting and Disassembling Rails
The next step is to remove your pool table’s pockets. You will need a 14 mm socket or wrench to remove the 12 bolts. After all the pockets have been removed from their respective rails, wrap each rail up to protect it from damage.
Removing the Felt
Get your staple remover and needle nosed pliers ready and give yourself ample time. When you are removing the felt from your table do not rush as you will want to prevent any unnecessary damage. If the felt is glued to the table be extra careful and very slowly pull back the felt (felt is notoriously easy to rip).
Here’s the deal:
Neatly fold the felt without putting any pressure on the fold lines – you don’t want to wrinkle or create creases. Store your table’s felt in a waterproof bag to prevent water damage during your long-distance move.
Disassembling the Slate Pieces
Your pool table will have 4 pieces of slate attached with 4 screws each. Before disassembling the slates, make sure to label each slate #1 – #4 to avoid any confusion when reassembling your table. Remember to mark the middle of your table so that you know the exact position of each slate when putting them back together. You will need extra help when moving each slate as they are heavy (250 lbs.) and a chip or scratch can ruin your whole table.
Taking apart the frame
After each slate has been properly removed, you can flip the table over and begin removing the legs. Be sure to properly label and securely attach all hardware and wrap legs up.
Your pool table has now been properly disassembled and is ready to be stored and packed away for your long-distance move. Double check to ensure that each part of your pool table has been labeled. We recommend that you pack your entire pool table together so that when it is being moved and reassembled, all the pieces are easily accessible.
This detailed step by step process of how to dissemble your pool table should allow you to easily and safely move your table long distances. If you have any questions or would like clarification on any of these steps, please don’t hesitate to contact us.

Moving day is coming: do you have everything packed? There is plenty of advice on how you should pack and fill up all the boxes for your move, but what can be very confusing is what to do with the larger items in your house. A quick look around your dining room probably reveals a lot of large, heavy furniture that you really don’t want scratched up. Here are some tips on how to get that bulky dining room packed up and ready for your move.
The Easy Stuff
If you are storing your draperies and tablecloths in the dining room, you are going to want to pack those up first. Make sure to fold them neatly and put them in large boxes (remember large boxes are for the light items). If they are made of a material that might get damaged by heat or other adverse environmental conditions, then you might want to enclose them in plastic or something that offers a little more protection than cardboard.
Empty Everything Out
Dishes, silverware and other items should be packed separately. Don’t try to move a china cabinet or buffet with items inside. It will increase the weight and may damage what is inside. Take the time to box up all the small things and label them so you know where to put them once you get into your new home.
The Dining Room Table
You want to start by disassembling the dining room table. Turn the table onto its side, carefully so as not to damage it and remove the legs. There is typically a bolt or two holding each of the legs on. Once you get the legs removed, put the hardware back into the legs. This way you will be sure that you don’t lose it, and you will know where it goes.
Wrap up the table in moving pads and use packing tape to secure them. To avoid damage you can use bubble wrap as well.
Wrap each of the legs in bubble wrap or some other cloth to protect them. Avoid taping the legs together, this can actually damage them or lead to scratches on them.
If you are looking to save money during your move, instead of using pads you can wrap your tabletop in bedroom sheets and your table legs in towels. Just remember to wash them once you get to your new home.
Chairs
If you can remove the legs from the chairs, do so. If not, then use furniture blankets and bubble wrap to cover any of the surfaces that could be scratched. Remove any cushions that you can before doing this as well as you don’t want them to be damaged by tape.
Hire Professional Movers in Kamloops
The easiest way to get your dining room moved is to have professional movers from Pioneer Moving help! We can tackle any move big or small. Contact us today for a quote!
We sell a complete line of packing and moving supplies, as well as providing professional Packing and Unpacking services.
![]()
![]()